Overview
The Bookmark tool in powerXP enables users to save personalized views for quick and convenient future access. If there’s a specific dashboard you frequently reference—especially with filters or settings applied—you can save it as a bookmark instead of manually recreating the view each time you log in.
This feature is designed to streamline your workflow, helping you quickly retrieve the insights you need instantly. Whether you're tracking key performance metrics or monitoring trends, bookmarks help you access your most relevant data with just a click.
Where to Access the Bookmark Tool
Within your MemberView portal, select powerXP to open the powerXP interactive dashboards. Once open, the bookmark tool will be located on the top right as shown below.

How to Use the Bookmark Tool
Get started by selecting the dashboard, results, and filters that you want to view. Once you have configured the dashboard to display your desired data, you are ready to create a bookmark!
To create the bookmark, you will use the following steps -
1. Click Bookmarks in the toolbar.
2. Select Create New Bookmark.
3. Enter a name for your bookmark in the Title field.
Note: Ensure the title is unique and not already in use.
4. (Optional) Add a description of the bookmark in the Description field.
5. Choose Save options based on your preferences.
a. Save Sheet Location
i. Check this option if you want the bookmark to switch to the dashboard that was open when the bookmark was created.
b. Save Layout
i. Check this option if you want to save current chart layouts, sorting, or expansions.
c. Save Variable State in Bookmarks
i. Check this option if you want to save the filters currently applied to the bookmark.
6. Click Create.
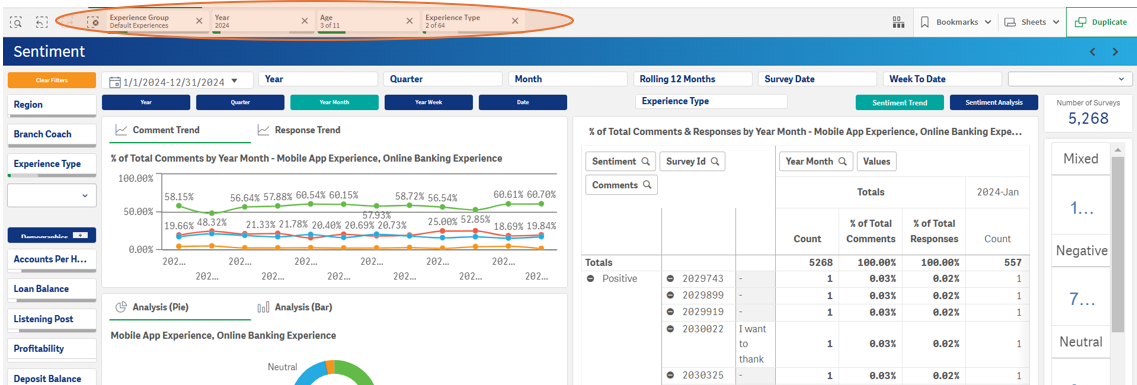
Let's walk through an example to illustrate this process. Suppose you want to create a bookmark to track Gen X members' sentiment towards their experiences with your online banking and mobile app. We will start by selecting the Sentiment sheet and applying the relevant filters for age, timeframe, and experience type.

Once the filters have been applied and the sheet is displaying your desired data, it is time to create the bookmark. Select Bookmarks, then Create new bookmark.

Next, we will name the bookmark, select our Save options, and click Create.

Now the bookmark has been saved and can be found under the Bookmarks section for future use! The next time we log in, we can simply click on our saved bookmark and powerXP will regenerate this view for us on demand.
Lastly, if you select the information button next to your bookmark, you can review your bookmark settings, edit the bookmark, or copy and share the bookmark with your team.


